| build怎么调试 react | 您所在的位置:网站首页 › react build后如何运行 › build怎么调试 react |
build怎么调试 react
|
Table of Contents generated with DocToc 概览本文包含以下内容: prepare: 组件库前期开发准备工作。eslint/commit lint/typescript等等; dev: 使用docz进行开发调试以及文档编写; build:`umd`/cjs/esm、types、polyfill 以及按需加载; test: 组件测试; release: 组件库发布流程; deploy: 使用now部署文档站点,待补充; other: 使用plop.js快速创建组件模板。 如果本文帮助到了你请给仓库 一颗 ✨✨。 如果有错误烦请在评论区指正交流,谢谢。 仓库地址 准备工作 初始化项目新建一个happy-ui文件夹,并初始化。 mkdir happy-uicd happy-uinpm init --ymkdir components && cd components && touch index.ts # 新建源码文件夹以及入口文件 代码规范此处直接使用@umijs/fabric的配置。 yarn add @umijs/fabric --devyarn add prettier --dev # 因为@umijs/fabric没有将prettier作为依赖 所以我们需要手动安装.eslintrc.js module.exports = { extends: [require.resolve('@umijs/fabric/dist/eslint')],};.prettierrc.js const fabric = require('@umijs/fabric');module.exports = { ...fabric.prettier,};.stylelintrc.js module.exports = { extends: [require.resolve('@umijs/fabric/dist/stylelint')],};想自行配置的同学可以参考以下文章: Linting Your React+Typescript Project with ESLint and Prettier! 使用 ESLint+Prettier 规范 React+Typescript 项目 Commit Lint进行pre-commit代码规范检测。 yarn add husky lint-staged --devpackage.json "lint-staged": { "components/**/*.ts?(x)": [ "prettier --write", "eslint --fix", "git add" ], "components/**/*.less": [ "stylelint --syntax less --fix", "git add" ]},"husky": { "hooks": { "pre-commit": "lint-staged" }}进行 Commit Message 检测。 yarn add @commitlint/cli @commitlint/config-conventional commitizen cz-conventional-changelog --dev新增.commitlintrc.js写入以下内容 module.exports = { extends: ['@commitlint/config-conventional'] };package.json 写入以下内容: // ..."scripts": { "commit": "git-cz",}// ..."husky": { "hooks": { "commit-msg": "commitlint -E HUSKY_GIT_PARAMS", "pre-commit": "lint-staged" }},"config": { "commitizen": { "path": "cz-conventional-changelog" }}后续使用 yarn commit 替代 git commit生成规范的 Commit Message,当然为了效率你可以选择手写,但是要符合规范。 TypeScript yarn add typescript --dev新建tsconfig.json并写入以下内容 { "compilerOptions": { "baseUrl": "./", "target": "esnext", "module": "commonjs", "jsx": "react", "declaration": true, "declarationDir": "lib", "strict": true, "moduleResolution": "node", "allowSyntheticDefaultImports": true, "esModuleInterop": true, "resolveJsonModule": true }, "include": ["components", "global.d.ts"], "exclude": ["node_modules"]} 测试在components文件夹下新建alert文件夹,目录结构如下: alert ├── alert.tsx # 源文件 ├── index.ts # 入口文件 ├── interface.ts # 类型声明文件 └── style ├── index.less # 样式文件 └── index.ts # 样式文件里为什么存在一个index.ts - 按需加载样式 管理样式依赖 后面章节会提到安装React相关依赖: yarn add react react-dom @types/react @types/react-dom --dev # 开发时依赖,宿主环境一定存在yarn add prop-types # 运行时依赖,宿主环境可能不存在 安装本组件库时一起安装此处依旧安装了prop-types这个库,因为无法保证宿主环境也使用typescript,从而能够进行静态检查,故使用prop-types保证javascript用户也能得到友好的运行时报错信息。 components/alert/interface.ts export type Kind = 'info' | 'positive' | 'negative' | 'warning';export type KindMap = Record;export interface AlertProps {/** * Set this to change alert kind * @default info */ kind?: 'info' | 'positive' | 'negative' | 'warning';}components/alert/alter.tsx import React from 'react';import t from 'prop-types';import { AlertProps, KindMap } from './interface';const prefixCls = 'happy-alert';const kinds: KindMap = { info: '#5352ED', positive: '#2ED573', negative: '#FF4757', warning: '#FFA502',};const Alert: React.FC = ({ children, kind = 'info', ...rest }) => ( background: kinds[kind], }} {...rest} > {children}div>);Alert.propTypes = {kind: t.oneOf(['info', 'positive', 'negative', 'warning']),};export default Alert;components/alert/index.ts import Alert from './alert';export default Alert;export * from './interface';components/alert/style/index.less @popupPrefix: happy-alert;.@{popupPrefix} { padding: 20px; background: white; border-radius: 3px; color: white;}components/alert/style/index.ts import './index.less';components/index.ts export { default as Alert } from './alert';此处组件参考的docz项目typescript以及less示例。 git 一把梭,可以看到控制台已经进行钩子检测了。 git add .yarn commit # 或 git commit -m'feat: chapter-1 准备工作'git push准备工作完成。代码可以在仓库的chapter-1分支获取,若存在与本文内容不符的地方,以master分支以及文章为准。 开发与调试本节解决开发组件时的预览以及调试问题,顺路解决文档编写。 此处选择docz来辅助预览调试。 docz基于MDX(Markdown + JSX),可以在 Markdown 中引入 React 组件,使得一边编写文档,一边预览调试成为了可能。而且得益于 React 组件生态,我们可以像编写应用一般编写文档,不仅仅是枯燥的文字。docz 也内置了一些组件,比如。 安装 docz 以及自定义配置 yarn add docz --devyarn add rimraf --dev # 清空目录的一个辅助库增加 npm scripts 至 package.json。 "scripts": { "dev": "docz dev", // 启动本地开发环境 "start": "npm run dev", // dev命令别名 "build:doc": "rimraf doc-site && docz build", // 后续会配置打包出来的文件目录名为doc-site,故每次build前删除 "preview:doc": "docz serve" // 预览文档站点},注意:本节所有操作都是针对站点应用。打包指代文档站点打包,而非组件库。 新建doczrc.js配置文件,并写入以下内容: doczrc.js export default { files: './components/**/*.{md,markdown,mdx}', // 识别的文件后缀 dest: 'doc-site', // 打包出来的文件目录名 title: 'happy-ui', // 站点标题 typescript: true, // 组件源文件是通过typescript开发,需要打开此选项};由于使用了less作为样式预处理器,故需要安装 less 插件。 yarn add less gatsby-plugin-less --dev新建gatsby-config.js,并写入以下内容: gatsby-config.js module.exports = { plugins: ['gatsby-theme-docz', 'gatsby-plugin-less'],}; 编写文档新建components/alert/index.mdx,并写入以下内容: ---name: Alert 警告提示route: /Alertmenu: 组件---import { Playground } from 'docz'; import Alert from './alert'; // 引入组件 import './style'; // 引入组件样式# Alert 警告提示警告提示,展现需要关注的信息。## 代码演示### 基本用法 这是一条警告提示Alert>Playground>## API| 属性 | 说明 | 类型 | 默认值 || ---- | -------- | -------------------------------------------- | ------ || kind | 警告类型 | 'info'/'positive'/'negative'/'warning'非必填 | 'info' |执行脚本命令: yarn start # or yarn dev可以在localhost:3000看到如下页面 : 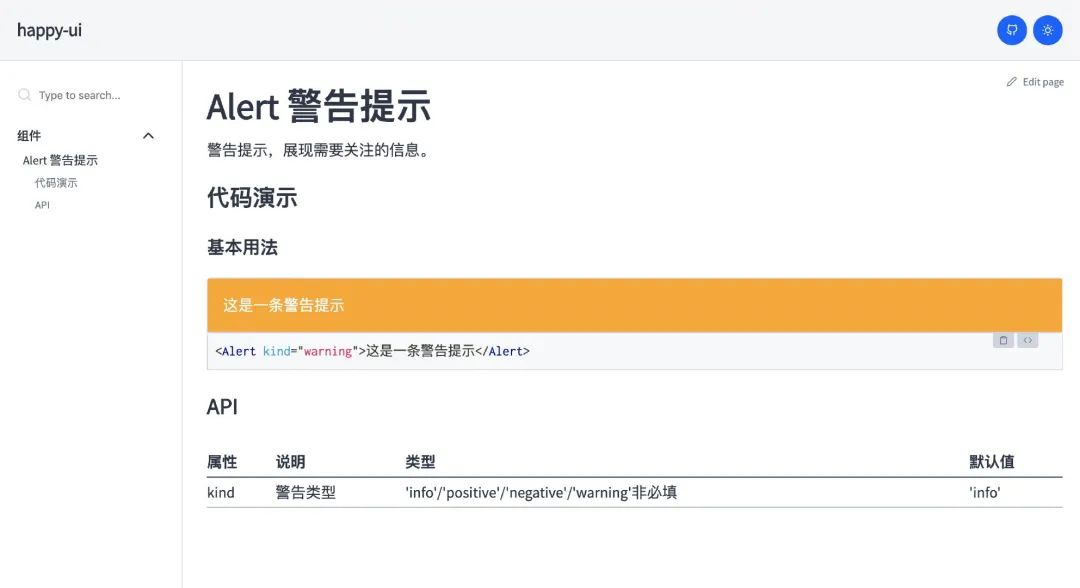 文档站点
文档站点
现在可以在index.mdx中愉快地进行文档编写和调试了! 倘若本文到了这里就结束(其实也可以结束了(_^▽^_)),那我只是官方文档的翻译复读机罢了,有兴趣的同学可以继续向下看。 优化文档编写如果代码演示部分的demo较多(比如基本用法、高级用法以及各种用法等等),在组件复杂的情况下(毕竟着实太简单了),会导致文档很长难以维护,你到底是在写文档呢还是在写代码呢? 那就抽离吧。 在components/alert/文件夹下新建demo文件夹,存放我们在编写文档时需要引用的 demo。 components/alert/demo/1-demo-basic.tsx import React from 'react';import Alert from '../alert';import '../style';export default () => Alert>;components/alert/index.mdx - import Alert from './alert'; // 引入组件- import './style'; // 引入组件样式+ import BasicDemo from './demo/1-demo-basic';...- 这是一条警告提示+这样我们就将 demo 与文档进行了分隔。预览如下: 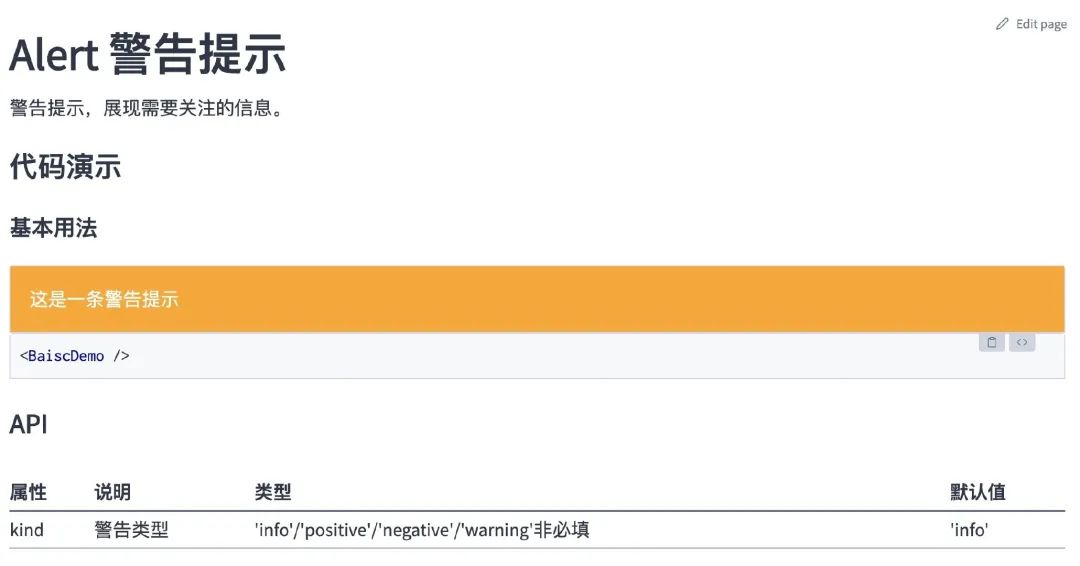 文档重构
文档重构
等等,下面显示的是,而非demo源码。 组件暂时无法支持上述形式的展示:自定义下方展示的代码,而非内部的代码。相关讨论如下: Allow to hide the LiveError overlay #907 Allow to override the playground's editor's code #906 其实第一条 PR 已经解决了问题,但是被关闭了,无奈。 不过既然都能引入 React 组件了,在MDX的环境下自定义一个Playground组件又有何难呢,无非就是渲染组件(MDX 自带)和展示源码,简单开放的东西大家都是喜闻乐见的,就叫HappyBox吧。 优化代码展示 编写 ``组件安装依赖: yarn add react-use react-tooltip react-feather react-simple-code-editor prismjs react-copy-to-clipboard raw-loader styled-components --devreact-use - 2020 年了,当然要用hooks react-simple-code-editor - 代码展示区域 prismjs - 代码高亮 raw-loader - 将源码转成字符串 react-copy-to-clipboard - 让用户爸爸们能够 copy demo 代码 react-tooltip/react-feather 辅助组件 styled-components 方便在文档示例中让用户看到样式,也用作文档组件的样式处理 这些依赖都是服务于文档站点应用,和组件库自身毫无关联。 最终效果如下: 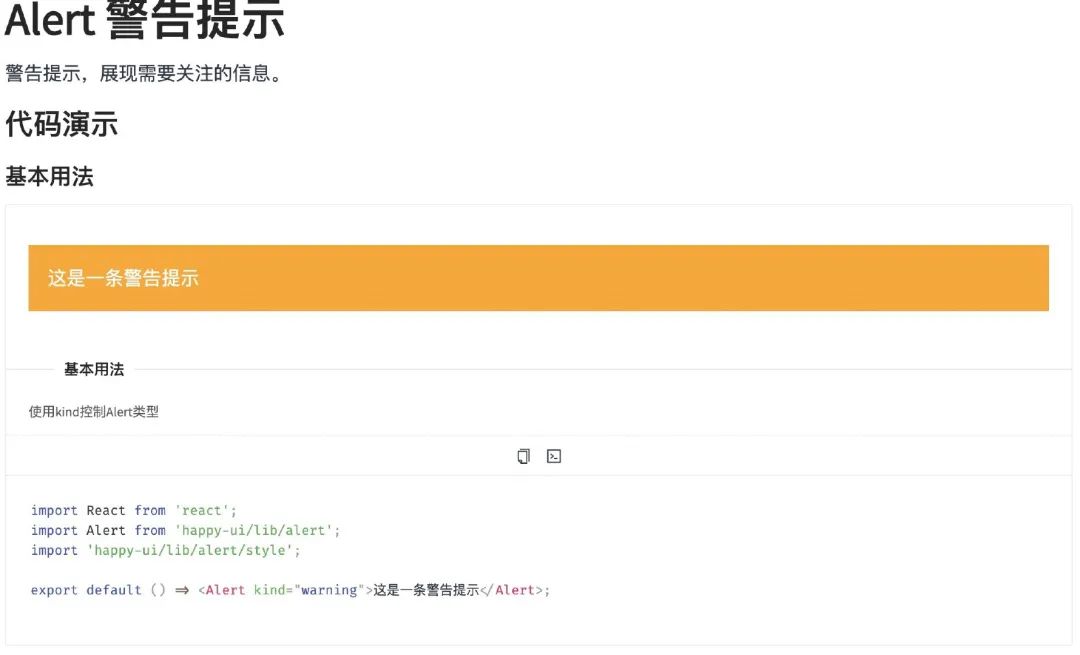 最终效果
最终效果
根目录下新建doc-comps文件夹,存放文档中使用的一些工具组件,比如。 doc-comps ├── happy-box│ ├── style.ts│ └── index.tsx└── index.tscomponents/doc-comps/happy-box/index.tsx import React from 'react';import Editor from 'react-simple-code-editor';import CopyToClipboard from 'react-copy-to-clipboard';import { useToggle } from 'react-use';import ReactTooltip from 'react-tooltip';import IconCopy from 'react-feather/dist/icons/clipboard';import IconCode from 'react-feather/dist/icons/code';import { highlight, languages } from 'prismjs/components/prism-core';import { StyledContainer, StyledIconWrapper } from './style';import 'prismjs/components/prism-clike';import 'prismjs/components/prism-javascript';import 'prismjs/components/prism-markup';require('prismjs/components/prism-jsx');interface Props { code: string; title?: React.ReactNode; desc?: React.ReactNode;}export const HappyBox: React.FC = ({ code, title, desc, children }) => {const [isEditVisible, toggleEditVisible] = useToggle(false);return ( {children} {title || '示例'}{desc || '暂无描述'} alert('复制成功')}> {renderEditor()} ); function renderEditor() { if (!isEditVisible) return null; return ( readOnly value={code} onValueChange={() => {}} highlight={code => highlight(code, languages.jsx)} padding={10} className="container__editor" style={{ fontFamily: '"Fira code", "Fira Mono", monospace', fontSize: 14, }} /> ); }};export default HappyBox; 相关配置变更增加 alias别名,样例源码展示相对路径不够友好,让用户直接拷贝才够省心 新建gatsby-node.js,写入以下内容以开启alias: const path = require('path');exports.onCreateWebpackConfig = args => { args.actions.setWebpackConfig({ resolve: { modules: [path.resolve(__dirname, '../src'), 'node_modules'], alias: { 'happy-ui/lib': path.resolve(__dirname, '../components/'), 'happy-ui/esm': path.resolve(__dirname, '../components/'), 'happy-ui': path.resolve(__dirname, '../components/'), }, }, });};tsconfig.json 打包时需要忽略demo,避免组件库打包生成types时包含其中,同时增加paths属性用于 vscode 自动提示: tsconfig.json { "compilerOptions": { "baseUrl": "./",+ "paths": {+ "happy-ui": ["components/index.ts"],+ "happy-ui/esm/*": ["components/*"],+ "happy-ui/lib/*": ["components/*"]+ }, "target": "esnext", "module": "commonjs", "jsx": "react", "declaration": true, "declarationDir": "lib", "strict": true, "moduleResolution": "node", "allowSyntheticDefaultImports": true, "esModuleInterop": true, "resolveJsonModule": true }, "include": ["components", "global.d.ts"],- "exclude": ["node_modules"]+ "exclude": ["node_modules", "**/demo/**"]}新的问题出现了,vscode 的 alias 提示依赖 tsconfig.json,忽略 demo 文件夹后,demo 内的文件模块类型找不到声明(paths 失效),所以不能将 demo 在 tsconfig.json 中移除: {- "exclude": ["node_modules", "**/demo/**"]+ "exclude": ["node_modules"]}新建一个 tsconfig.build.json 文件: tsconfig.build.json { "extends": "./tsconfig.json", "exclude": ["**/demo/**", "node_modules"]}后续使用 tsc 生成类型声明文件指定tsconfig.build.json即可。 改造相关文件components/alert/demo/1-demo-basic.tsx - import Alert from '../alert';+ import Alert from 'happy-ui/lib/alert';- import '../style';+ import 'happy-ui/lib/alert/style';components/alert/index.mdx - import { Playground } from 'docz';+ import { HappyBox } from '../../doc-comps';+ import BasicDemoCode from '!raw-loader!./demo/1-demo-basic.tsx';...- - - + + +yarn start卡住时尝试删除根目录.docz文件夹,而后重新执行命令。 现在可以愉快地开发组件了。代码可以在仓库的chapter-2分支获取,若存在与本文内容不符的地方,以master分支以及文章为准。 组件库打包宿主环境各不相同,需要将源码进行相关处理后发布至 npm。 明确以下目标: 导出类型声明文件 导出 umd/Commonjs module/ES module 等 3 种形式供使用者引入 支持样式文件 css 引入,而非只有less 支持按需加载 导出类型声明文件既然是使用typescript编写的组件库,那么使用者应当享受到类型系统的好处。 我们可以生成类型声明文件,并在package.json中定义入口,如下: package.json { "typings": "lib/index.d.ts", // 定义类型入口文件 "scripts": { "build:types": "tsc -p tsconfig.build.json && cpr lib esm" // 执行tsc命令生成类型声明文件 }}值得注意的是:此处使用cpr将lib的声明文件拷贝了一份,重命名为esm。用于后面存放 ES module 形式的组件。这样做主要是为了用户手动按需引入组件时依旧可以有自动提示。 最开始使用的将声明文件单独打包成一个types文件夹,这样只通过'happy-ui'引入才可以有自动提示,但是'happy-ui/esm/xxx'和'happy-ui/lib/xxx'就无法提示。 tsconfig.build.json { "extends": "./tsconfig.json", "compilerOptions": { "emitDeclarationOnly": true }, // 只生成声明文件 "exclude": ["**/__tests__/**", "**/demo/**", "node_modules", "lib", "esm"] // 排除示例、测试以及打包好的文件夹}执行yarn build:types,可以发现根目录下已经生成了lib文件夹(tsconfig.json中定义的declarationDir字段),目录结构与components文件夹保持一致,如下: types ├── alert│ ├── alert.d.ts│ ├── index.d.ts│ ├── interface.d.ts│ └── style│ └── index.d.ts└── index.d.ts这样使用者引入npm 包时,便能得到自动提示,也能够复用相关组件的类型定义。 接下来将ts(x)等文件处理成js文件。 需要注意的是,我们需要输出Commonjs module以及ES module两种模块类型的文件(暂不考虑umd),以下使用cjs指代Commonjs module,esm指代ES module。 对此有疑问的同学推荐阅读:import、require、export、module.exports 混合详解 导出 Commonjs 模块其实完全可以使用babel或tsc命令行工具进行代码编译处理(实际上很多工具库就是这样做的),但考虑到还要处理样式及其按需加载,我们借助 gulp 来串起这个流程。 babel 配置首先安装babel及其相关依赖 yarn add @babel/core @babel/preset-env @babel/preset-react @babel/preset-typescript @babel/plugin-proposal-class-properties @babel/plugin-transform-runtime --dev yarn add @babel/runtime-corejs3新建.babelrc.js文件,写入以下内容: .babelrc.js module.exports = { presets: ['@babel/env', '@babel/typescript', '@babel/react'], plugins: [ '@babel/proposal-class-properties', [ '@babel/plugin-transform-runtime', { corejs: 3, helpers: true, }, ], ],};关于@babel/plugin-transform-runtime与@babel/runtime-corejs3: 若helpers选项设置为true,可抽离代码编译过程重复生成的 helper 函数(classCallCheck,extends等),减小生成的代码体积; 若corejs设置为3,可引入不污染全局的按需polyfill,常用于类库编写(我更推荐:不引入polyfill,转而告知使用者需要引入何种polyfill,避免重复引入或产生冲突,后面会详细提到)。 更多参见官方文档-@babel/plugin-transform-runtime 配置目标环境 为了避免转译浏览器原生支持的语法,新建.browserslistrc文件,根据适配需求,写入支持浏览器范围,作用于@babel/preset-env。 .browserslistrc >0.2%not deadnot op_mini all很遗憾的是,@babel/runtime-corejs3无法在按需引入的基础上根据目标浏览器支持程度再次减少polyfill的引入,参见@babel/runtime for target environment 。 这意味着@babel/runtime-corejs3 甚至会在针对现代引擎的情况下注入所有可能的 polyfill:不必要地增加了最终捆绑包的大小。 对于组件库(代码量可能很大),个人建议将polyfill的选择权交还给使用者,在宿主环境进行polyfill。若使用者具有兼容性要求,自然会使用@babel/preset-env + core-js + .browserslistrc进行全局polyfill,这套组合拳引入了最低目标浏览器不支持API的全部 polyfill。 业务开发中,将@babel/preset-env的useBuiltIns选项值设置为 usage,同时把node_modules从babel-loader中exclude掉的同学可能想要这个特性:"useBuiltIns: usage" for node_modules without transpiling #9419,在未支持该issue提到的内容之前,还是乖乖地将useBuiltIns设置为entry,或者不要把node_modules从babel-loader中exclude。 所以组件库不用画蛇添足,引入多余的polyfill,写好文档说明,比什么都重要(就像zent和antd这样)。 现在@babel/runtime-corejs3更换为@babel/runtime,只进行helper函数抽离。 yarn remove @babel/runtime-corejs3yarn add @babel/runtime.babelrc.js module.exports = { presets: ['@babel/env', '@babel/typescript', '@babel/react'], plugins: ['@babel/plugin-transform-runtime', '@babel/proposal-class-properties'],};@babel/transform-runtime的helper选项默认为true。 gulp 配置再来安装gulp相关依赖 yarn add gulp gulp-babel --dev新建gulpfile.js,写入以下内容: gulpfile.js const gulp = require('gulp');const babel = require('gulp-babel');const paths = { dest: { lib: 'lib', // commonjs 文件存放的目录名 - 本块关注 esm: 'esm', // ES module 文件存放的目录名 - 暂时不关心 dist: 'dist', // umd文件存放的目录名 - 暂时不关心 }, styles: 'components/**/*.less', // 样式文件路径 - 暂时不关心 scripts: ['components/**/*.{ts,tsx}', '!components/**/demo/*.{ts,tsx}'], // 脚本文件路径};function compileCJS() { const { dest, scripts } = paths; return gulp .src(scripts) .pipe(babel()) // 使用gulp-babel处理 .pipe(gulp.dest(dest.lib));}// 并行任务 后续加入样式处理 可以并行处理const build = gulp.parallel(compileCJS);exports.build = build;exports.default = build;修改package.json package.json {- "main": "index.js",+ "main": "lib/index.js", "scripts": { ...+ "clean": "rimraf lib esm dist",+ "build": "npm run clean && npm run build:types && gulp", ... },}执行yarn build,得到如下内容: lib ├── alert│ ├── alert.js│ ├── index.js│ ├── interface.js│ └── style│ └── index.js└── index.js观察编译后的源码,可以发现:诸多helper方法已被抽离至@babel/runtime中,模块导入导出形式也是commonjs规范。 lib/alert/alert.js 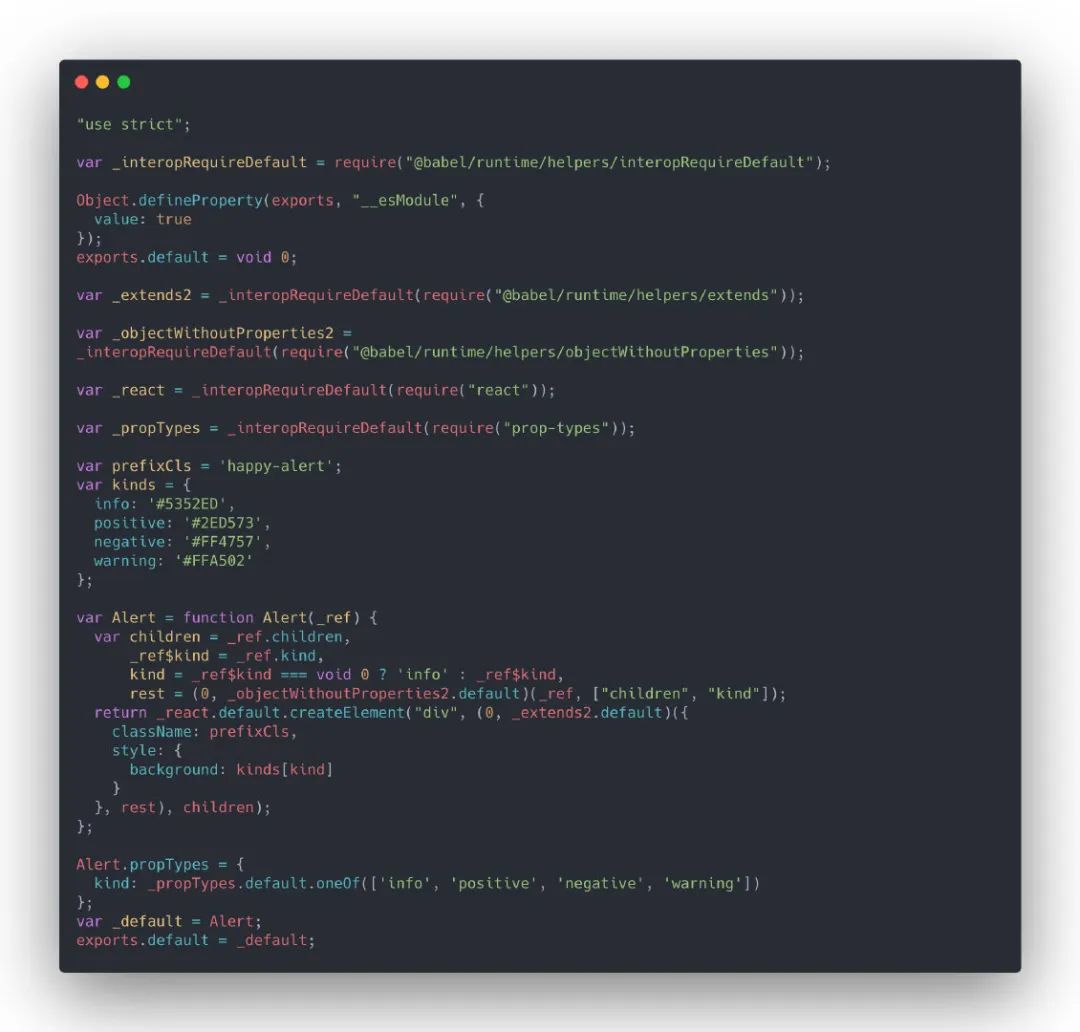 lib/alert/alert.js
导出 ES module
lib/alert/alert.js
导出 ES module
生成ES module可以更好地进行tree shaking,基于上一步的babel配置,更新以下内容: 配置@babel/preset-env的modules选项为false,关闭模块转换; 配置@babel/plugin-transform-runtime的useESModules选项为true,使用ES module形式引入helper函数。 .babelrc.js module.exports = { presets: [ [ '@babel/env', { modules: false, // 关闭模块转换 }, ], '@babel/typescript', '@babel/react', ], plugins: [ '@babel/proposal-class-properties', [ '@babel/plugin-transform-runtime', { useESModules: true, // 使用esm形式的helper }, ], ],};目标达成,我们再使用环境变量区分esm和cjs(执行任务时设置对应的环境变量即可),最终babel配置如下: .babelrc.js module.exports = { presets: ['@babel/env', '@babel/typescript', '@babel/react'], plugins: ['@babel/plugin-transform-runtime', '@babel/proposal-class-properties'], env: { esm: { presets: [ [ '@babel/env', { modules: false, }, ], ], plugins: [ [ '@babel/plugin-transform-runtime', { useESModules: true, }, ], ], }, },};接下来修改gulp相关配置,抽离compileScripts任务,增加compileESM任务。 gulpfile.js // .../** * 编译脚本文件 * @param {string} babelEnv babel环境变量 * @param {string} destDir 目标目录 */function compileScripts(babelEnv, destDir) { const { scripts } = paths; // 设置环境变量 process.env.BABEL_ENV = babelEnv; return gulp .src(scripts) .pipe(babel()) // 使用gulp-babel处理 .pipe(gulp.dest(destDir));}/** * 编译cjs */function compileCJS() { const { dest } = paths; return compileScripts('cjs', dest.lib);}/** * 编译esm */function compileESM() { const { dest } = paths; return compileScripts('esm', dest.esm);}// 串行执行编译脚本任务(cjs,esm) 避免环境变量影响const buildScripts = gulp.series(compileCJS, compileESM);// 整体并行执行任务const build = gulp.parallel(buildScripts);// ...执行yarn build,可以发现生成了lib/esm三个文件夹,观察esm目录,结构同lib一致,js 文件都是以ES module模块形式导入导出。 esm/alert/alert.js 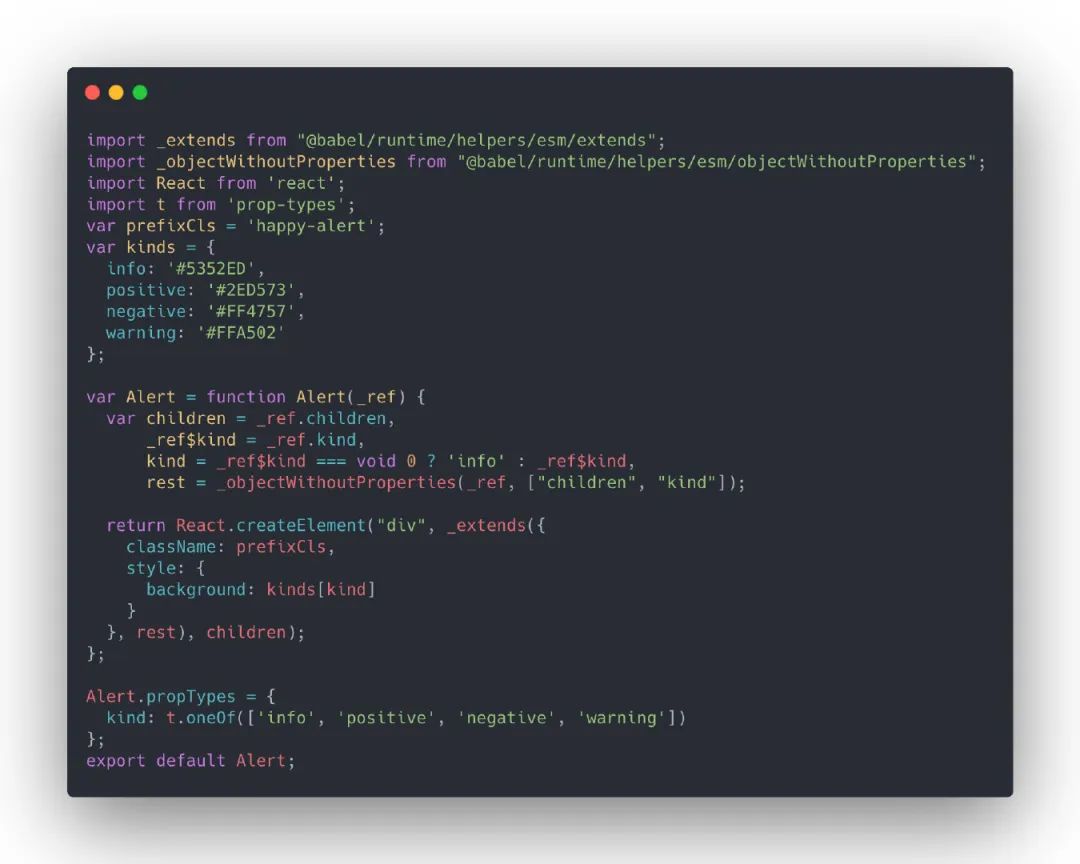 esm/alert/alert.js
别忘了给package.json增加相关入口。 package.json {+ "module": "esm/index.js"} 处理样式文件 拷贝 less 文件我们会将less文件包含在npm包中,用户可以通过happy-ui/lib/alert/style/index.js的形式按需引入less文件,此处可以直接将 less 文件拷贝至目标文件夹。 在gulpfile.js中新建copyLess任务。 gulpfile.js // .../** * 拷贝less文件 */function copyLess() { return gulp .src(paths.styles) .pipe(gulp.dest(paths.dest.lib)) .pipe(gulp.dest(paths.dest.esm));}const build = gulp.parallel(buildScripts, copyLess);// ...观察lib目录,可以发现 less 文件已被拷贝至alert/style目录下。 lib ├── alert│ ├── alert.js│ ├── index.js│ ├── interface.js│ └── style│ ├── index.js│ └── index.less # less文件└── index.js可能有些同学已经发现问题:若使用者没有使用less预处理器,使用的是sass方案甚至原生css方案,那现有方案就搞不定了。经分析,有以下 3 种预选方案: 告知用户增加less-loader; 打包出一份完整的 css 文件,进行全量引入; 单独提供一份style/css.js文件,引入的是组件 css样式文件依赖,而非 less 依赖,组件库底层抹平差异; 使用css in js方案。 方案 1 会导致业务方使用成本增加。 方案 2 无法进行按需引入。 方案 4 需要详细聊聊。 css in js除了赋予样式编写更多的可能性之外,在编写第三方组件库时更是利器。 如果我们写一个react-use这种hooks工具库,不涉及到样式,只需要在package.json中设置sideEffects为false,业务方使用 webpack 进行打包时,只会打包被使用到的 hooks(优先使用 ES module)。 入口文件index.js中导出的但未被使用的其他 hooks 会被tree shaking,第一次使用这个库的时候我很好奇,为什么没有按需引入的使用方式,结果打包分析时我傻了,原来人家天生支持按需引入。 可能常用的antd以及lodash都要配一配,导致产生了惯性思维。 回到正题。如果将样式使用javascript来编写,在某种维度上讲,组件库和工具库一致了,配好sideEffects,自动按需引入,美滋滋。 而且每个组件都与自己的样式绑定,不需要业务方或组件开发者去维护样式依赖,什么是样式依赖,后面会讲到。 缺点: 样式无法单独缓存; styled-components 自身体积较大; 复写组件样式需要使用属性选择器或者使用styled-components,麻烦了点。 需要看取舍了,偷偷说一句styled-components做主题定制也极其方便。 方案 3 是antd使用的这种方案。 在搭建组件库的过程中,有一个问题困扰了我很久:为什么需要alert/style/index.js引入less文件或alert/style/css.js引入css文件? 答案是管理样式依赖。 因为我们的组件是没有引入样式文件的,需要用户去手动引入。 假设存在以下场景:引入,依赖了,使用者需要手动去引入调用的组件的样式()及其依赖的组件样式(),遇到复杂组件极其麻烦,所以组件库开发者可以提供一份这样的js文件,使用者手动引入这个js文件,就能引入对应组件及其依赖组件的样式。 那么问题又来了,为什么组件不能自己去import './index.less'呢? 可以,不过业务方要配置less-loader,什么,业务方不想配,要你import './index.css'?? 可以,业务方爽了,组件开发方不爽。 所以我们要找一个大家都爽的方案: 开发方能够开心的使用预处理器; 业务方不需要额外的使用成本。 答案就是css in js单独提供一份style/css.js文件,引入的是组件 css样式文件依赖,而非 less 依赖,组件库底层抹平差异。 之前了解到father可以在打包的时候将index.less转成index.css,这倒是个好法子,但是一些重复引入的样式模块(比如动画样式),会被重复打包,不知道有没有好的解决方案。 生成 css 文件安装相关依赖。 yarn add gulp-less gulp-autoprefixer gulp-cssnano --dev将less文件生成对应的css文件,在gulpfile.js中增加less2css任务。 // .../** * 生成css文件 */function less2css() { return gulp .src(paths.styles) .pipe(less()) // 处理less文件 .pipe(autoprefixer()) // 根据browserslistrc增加前缀 .pipe(cssnano({ zindex: false, reduceIdents: false })) // 压缩 .pipe(gulp.dest(paths.dest.lib)) .pipe(gulp.dest(paths.dest.esm));}const build = gulp.parallel(buildScripts, copyLess, less2css);// ...执行yarn build,组件style目录下已经存在css文件了。 接下来我们需要一个alert/style/css.js来帮用户引入css文件。 生成 css.js此处参考antd-tools的实现方式:在处理scripts任务中,截住style/index.js,生成style/css.js,并通过正则将引入的less文件后缀改成css。 安装相关依赖。 yarn add through2 --devgulpfile.js // .../** * 编译脚本文件 * @param {*} babelEnv babel环境变量 * @param {*} destDir 目标目录 */function compileScripts(babelEnv, destDir) { const { scripts } = paths; process.env.BABEL_ENV = babelEnv; return gulp .src(scripts) .pipe(babel()) // 使用gulp-babel处理 .pipe( through2.obj(function z(file, encoding, next) { this.push(file.clone()); // 找到目标 if (file.path.match(/(\/|\\)style(\/|\\)index\.js/)) { const content = file.contents.toString(encoding); file.contents = Buffer.from(cssInjection(content)); // 文件内容处理 file.path = file.path.replace(/index\.js/, 'css.js'); // 文件重命名 this.push(file); // 新增该文件 next(); } else { next(); } }), ) .pipe(gulp.dest(destDir));}// ...cssInjection的实现: gulpfile.js /** * 当前组件样式 import './index.less' => import './index.css' * 依赖的其他组件样式 import '../test-comp/style' => import '../test-comp/style/css.js' * 依赖的其他组件样式 import '../test-comp/style/index.js' => import '../test-comp/style/css.js' * @param {string} content */function cssInjection(content) { return content .replace(/\/style\/?'/g, "/style/css'") .replace(/\/style\/?"/g, '/style/css"') .replace(/\.less/g, '.css');}再进行打包,可以看见组件style目录下生成了css.js文件,引入的也是上一步less转换而来的css文件。 lib/alert ├── alert.js├── index.js├── interface.js└── style ├── css.js # 引入index.css ├── index.css ├── index.js └── index.less 按需加载在 package.json 中增加sideEffects属性,配合ES module达到tree shaking效果(将样式依赖文件标注为side effects,避免被误删除)。 // ..."sideEffects": [ "dist/*", "esm/**/style/*", "lib/**/style/*", "*.less"],// ...使用以下方式引入,可以做到js部分的按需加载,但需要手动引入样式: import { Alert } from 'happy-ui';import 'happy-ui/esm/alert/style';也可以使用以下方式引入: import Alert from 'happy-ui/esm/alert'; // or import Alert from 'happy-ui/lib/alert';import 'happy-ui/esm/alert/style'; // or import Alert from 'happy-ui/lib/alert';以上引入样式文件的方式不太优雅,直接入口处引入全量样式文件又和按需加载的本意相去甚远。 使用者可以借助babel-plugin-import来进行辅助,减少代码编写量(说好的不加入其他使用成本的呢~)。 import { Alert } from 'happy-ui';⬇️ import Alert from 'happy-ui/lib/alert';import 'happy-ui/lib/alert/style'; 生成 umd没用上,这一块标记为 todo 吧。 本节代码可以在仓库的chapter-3分支获取,若存在与本文内容不符的地方,以master分支以及文章为准。 组件测试与软件操作行为越接近的测试,越能给予你信心。 本节主要讲述如何在组件库中引入jest以及@testing-library/react,而不会深入单元测试的学习。 如果你对下列问题感兴趣: What-单元测试是什么? Why-为什么要写单元测试? How-编写单元测试的最佳实践? 那么可以看看以下文章: Test React apps with React Testing Library:通过一个的例子延伸,阐述了选择React Testing Library而非Enzyme的理由,并对其进行了一些入门教学; React Testing Library:@testing-library/react的官方文档,该库提供的 API 在某个程度上就是在指引开发者进行单元测试的最佳实践; React Testing Library-examples:@testing-library/react的一些实例,提供了各种常见场景的测试; React 单元测试策略及落地:如标题所示,值得一看。 相关配置安装依赖: yarn add jest ts-jest @testing-library/react @testing-library/jest-dom identity-obj-proxy @types/jest @types/testing-library__react --devjest: JavaScript 测试框架,专注于简洁明快; ts-jest:为TypeScript编写jest测试用例提供支持; @testing-library/react:简单而完整的React DOM测试工具,鼓励良好的测试实践; @testing-library/jest-dom:自定义的jest匹配器(matchers),用于测试DOM的状态(即为jest的except方法返回值增加更多专注于DOM的matchers); identity-obj-proxy:一个工具库,此处用来mock样式文件。 新建jest.config.js,并写入相关配置,更多配置可参考jest 官方文档-配置,只看几个常用的就可以。 jest.config.js module.exports = { verbose: true, roots: ['/components'], moduleNameMapper: { '\\.(css|less|scss)$': 'identity-obj-proxy', '^components$': '/components/index.tsx', '^components(.*)$': '/components/$1', }, testRegex: '(/test/.*|\\.(test|spec))\\.(ts|tsx|js)$', moduleFileExtensions: ['ts', 'tsx', 'js', 'jsx'], testPathIgnorePatterns: ['/node_modules/', '/lib/', '/esm/', '/dist/'], preset: 'ts-jest', testEnvironment: 'jsdom',};修改package.json,增加测试相关命令,并且代码提交前,跑测试用例,如下: package.json "scripts": { ...+ "test": "jest", # 执行jest+ "test:watch": "jest --watch", # watch模式下执行+ "test:coverage": "jest --coverage", # 生成测试覆盖率报告+ "test:update": "jest --updateSnapshot" # 更新快照},..."lint-staged": { "components/**/*.ts?(x)": [ "prettier --write", "eslint --fix",+ "jest --bail --findRelatedTests", "git add" ], ...}修改gulpfile.js以及tsconfig.json,避免打包时,把测试文件一并处理了。 gulpfile.js const paths = { ...- scripts: ['components/**/*.{ts,tsx}', '!components/**/demo/*.{ts,tsx}'],+ scripts: [+ 'components/**/*.{ts,tsx}',+ '!components/**/demo/*.{ts,tsx}',+ '!components/**/__tests__/*.{ts,tsx}',+ ],};tsconfig.json {- "exclude": ["components/**/demo"]+ "exclude": ["components/**/demo", "components/**/__tests__"]} 编写测试用例比较简单,此处只作示例用,简单进行一下快照测试。 在对应组件的文件夹下新建__tests__文件夹,用于存放测试文件,其内新建index.test.tsx文件,写入以下测试用例: components/alert/tests/index.test.tsx import React from 'react';import { render } from '@testing-library/react';import Alert from '../alert';describe('', () => { test('should render default', () => { const { container } = render(defaultAlert>); expect(container).toMatchSnapshot(); }); test('should render alert with type', () => { const kinds: any[] = ['info', 'warning', 'positive', 'negative']; const { getByText } = render( {kinds.map(k => ( {k}Alert> ))}>, ); kinds.forEach(k => { expect(getByText(k)).toMatchSnapshot(); }); });});更新一下快照: yarn test:update可以看见同级目录下新增了一个__snapshots__文件夹,里面存放对应测试用例的快照文件。 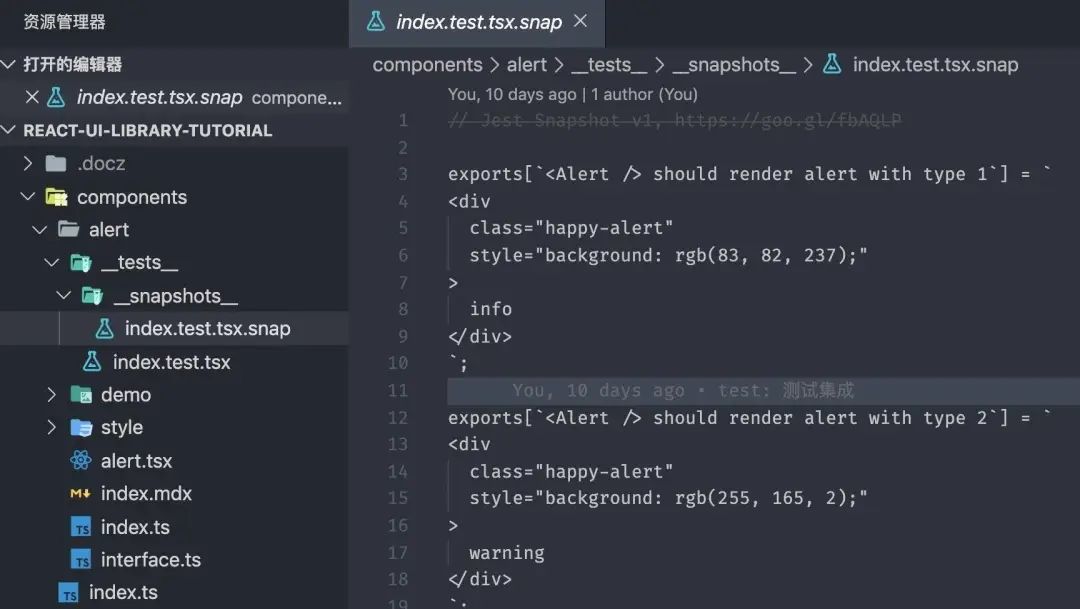 生成的快照文件
再执行测试用例: yarn test
通过测试用例
可以发现我们通过了测试用例。。。额,这里当然能通过,主要是后续我们进行迭代重构时,都会重新执行测试用例,与最近的一次快照进行比对,如果与快照不一致(结构发生了改变),那么相应的测试用例就无法通过。 对于快照测试,褒贬不一,这个例子也着实简单得很,甚至连扩展的 jest-dom提供的 matchers 都没用上。 如何编写优秀的测试用例,我也是一个新手,只能说多看多写多尝试,前面推荐的文章很不错。 本节代码可以在仓库的chapter-4分支获取,若存在与本文内容不符的地方,以master分支以及文章为准。 标准化发布流程本节主要是讲解如何通过一行命令完成以下六点内容: 版本更新 生成 CHANGELOG 推送至 git 仓库 组件库打包 发布至 npm 打 tag 并推送至 git 如果你不想代码,很好,用np(如果我一开始就知道这个工具,我也不会去写代码,我真傻,真的)。 package.json "scripts": {+ "release": "ts-node ./scripts/release.ts"},直接甩代码吧,实在不复杂。 /* eslint-disable import/no-extraneous-dependencies,@typescript-eslint/camelcase, no-console */import inquirer from 'inquirer';import fs from 'fs';import path from 'path';import child_process from 'child_process';import util from 'util';import chalk from 'chalk';import semverInc from 'semver/functions/inc';import { ReleaseType } from 'semver';import pkg from '../package.json';const exec = util.promisify(child_process.exec);const run = async (command: string) => { console.log(chalk.green(command)); await exec(command);};const currentVersion = pkg.version;const getNextVersions = (): { [key in ReleaseType]: string | null } => ({ major: semverInc(currentVersion, 'major'), minor: semverInc(currentVersion, 'minor'), patch: semverInc(currentVersion, 'patch'), premajor: semverInc(currentVersion, 'premajor'), preminor: semverInc(currentVersion, 'preminor'), prepatch: semverInc(currentVersion, 'prepatch'), prerelease: semverInc(currentVersion, 'prerelease'),});const timeLog = (logInfo: string, type: 'start' | 'end') => { let info = ''; if (type === 'start') { info = `=> 开始任务:${logInfo}`; } else { info = `✨ 结束任务:${logInfo}`; } const nowDate = new Date(); console.log( `[${nowDate.toLocaleString()}.${nowDate .getMilliseconds() .toString() .padStart(3, '0')}] ${info} `, );};/** * 获取下一次版本号 */async function prompt(): Promise { const nextVersions = getNextVersions(); const { nextVersion } = await inquirer.prompt([ { type: 'list', name: 'nextVersion', message: `请选择将要发布的版本 (当前版本 ${currentVersion})`, choices: (Object.keys(nextVersions) as Array).map(level => ({ name: `${level} => ${nextVersions[level]}`, value: nextVersions[level], })), }, ]); return nextVersion;}/** * 更新版本号 * @param nextVersion 新版本号 */async function updateVersion(nextVersion: string) { pkg.version = nextVersion; timeLog('修改package.json版本号', 'start'); await fs.writeFileSync(path.resolve(__dirname, './../package.json'), JSON.stringify(pkg)); await run('npx prettier package.json --write'); timeLog('修改package.json版本号', 'end');}async function generateChangelog() { timeLog('生成CHANGELOG.md', 'start'); await run(' npx conventional-changelog -p angular -i CHANGELOG.md -s -r 0'); timeLog('生成CHANGELOG.md', 'end');}/** * 将代码提交至git */async function push(nextVersion: string) { timeLog('推送代码至git仓库', 'start'); await run('git add package.json CHANGELOG.md'); await run(`git commit -m "v${nextVersion}" -n`); await run('git push'); timeLog('推送代码至git仓库', 'end');}/** * 组件库打包 */async function build() { timeLog('组件库打包', 'start'); await run('npm run build'); timeLog('组件库打包', 'end');}/** * 发布至npm */async function publish() { timeLog('发布组件库', 'start'); await run('npm publish'); timeLog('发布组件库', 'end');}/** * 打tag提交至git */async function tag(nextVersion: string) { timeLog('打tag并推送至git', 'start'); await run(`git tag v${nextVersion}`); await run(`git push origin tag v${nextVersion}`); timeLog('打tag并推送至git', 'end');}async function main() { try { const nextVersion = await prompt(); const startTime = Date.now(); // =================== 更新版本号 =================== await updateVersion(nextVersion); // =================== 更新changelog =================== await generateChangelog(); // =================== 代码推送git仓库 =================== await push(nextVersion); // =================== 组件库打包 =================== await build(); // =================== 发布至npm =================== await publish(); // =================== 打tag并推送至git =================== await tag(nextVersion); console.log(`✨ 发布流程结束 共耗时${((Date.now() - startTime) / 1000).toFixed(3)}s`); } catch (error) { console.log('? 发布失败,失败原因:', error); }}main(); 初始化组件每次初始化一个组件就要新建许多文件以及文件夹,复制粘贴也可,不过还可以使用更高级一点的偷懒方式。 常规思路,新建一个组件模板文件夹,里面包含一个组件所需要的所有文件,同时写好文件内容。 至于一些动态内容,譬如组件中英文名称,选一个你喜欢的模板语言(如 handlebars),用其方式留空{{componentName}}。 package.json "scripts": {+ "new": "ts-node ./scripts/new.ts"},接下来我们在new.ts中编写相关步骤,无非是: 基于inquirer.js询问一些基本组件信息 结合信息,渲染模板(填空)至组件文件夹 向 components/index.ts 插入导出语句 你以为我会写new.ts吗,不,我不会(虽然我真写过)。 主要是使用metalsmith进行数据与模板结合,写脚手架的同学可能比较熟悉。 自从我知道了plop.js这个库,那么又可以偷懒了(为什么之前没有人告诉我有这么多好用的工具???) "scripts": {- "new": "ts-node ./scripts/new.ts",+ "new": "plop --plopfile ./scripts/plopfile.ts",},于是上述流程可以大大简化,不需要写代码去询问,不需要手动渲染模板,我们要做的就是写好模板,并且配置好问题以及渲染目的地。 详情可见: 配置文件:scripts/plopfile.ts 模板文件:templates/component 结语文章很长,也是我个人学习中的总结,如果本文帮助到了你请给仓库一颗 ✨✨ 和本文一个赞。 如果有错误烦请在评论区指正交流,谢谢。 仓库地址:https://github.com/worldzhao/react-ui-library-tutorial 推荐阅读 我的公众号能带来什么价值?(文末有送书规则,一定要看) 每个前端工程师都应该了解的图片知识(长文建议收藏) 为什么现在面试总是面试造火箭?
|


【本文地址】